What is Iterative Offset Refinement?
Iterative Offset Refinement is the process of using one offset to locate the part and a second offset to refine the accuracy of the first offset. The robot uses both offsets to adjust work paths based on the position of the part that is in the work zone. Iterative Offset Refinement is useful when the robot requires very accurate, additional (+/- 1 mm) vision offsets or the part moves significantly from the expected position (over 100mm in x, y, z, and 30 degrees in rx, ry, rz). This method benefits customers with processes including de–racking mobile racks, picking and placing parts on a conveyor, and more.
What processes can be automated using Iterative Offset Refinement?
Iterative Offset Refinement is specifically for customers who need +/-1.0 mm vision offset accuracy to perform the robot’s work. It’s also an ideal choice when the part will move more than +/-100 mm in x, y, z and rotate more than 30 degrees in any dimension. Customers should consider Iterative Offset Refinement when +/-1.5 mm vision offset accuracy, the V-Guide™ standard, is not sufficient for the specific project.
In order to benefit from this method, customers also need the flexibility to have increased vision cycle time. When one robot mounted sensor is used, Iterative Offset Refinement increases the vision offset measurement time from around 1 second to 2-3 seconds.
What applications are ideal for this method?
The Iterative Offset Refinement method is ideal when robots are picking parts off a conveyor that does not use carriers or jigs. When carriers and jigs are not present, the part position will vary significantly from part to part. Iterative Offset Refinement ensures that the part only needs to be presented to the vision system in the taught orientation. This allows a human or robot to load parts onto a conveyor without worrying about positioning the part precisely.
Iterative Offset Refinement is optimal for picking parts from a rack when the racks have poor repeatability or are likely to move. During this process, the first sensor image is used to calculate the position of the first part in the rack. Based on the position and orientation of the first part in the rack, V-Guide™ determines the position and orientation of the entire rack. The robot applies the first offset to adjust the robot–mounted sensor’s position. V-Guide™ then calculates the position of the rest of the parts in the rack one by one. The first part offset is calculated once and is used to optimize the view of each individual part in the rack. For each part picked thereafter, the robot applies the first offset to the second measure position for V-Guide™ to calculate the refinement offset. The robot applies the refinement offset to de-rack each part which increases the overall accuracy.
Iterative Offset Refinement can also be optimally used with fixtures that have worn overtime, where the wearing creates more significant part movement. Worn fixtures may degrade the accuracy of the system because the parts are able to move farther from the trained position. Iterative Offset Refinement improves the accuracy of the vision system and increases the magnitude of part offset that can be calculated by V-Guide™.
How does the process work?
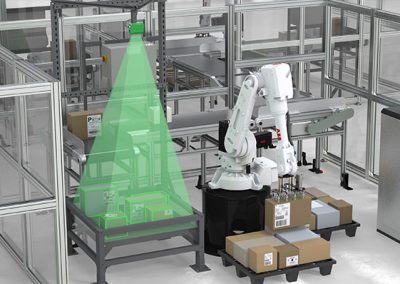
This demo shows one stationary sensor taking the first image of the part; the sensor can either be robot-mounted or stationary. The sensor provides data to V-Guide™ which allows it to calculate the approximate position of the part. The first sensor should be stationary when/if vision cycle time is limited. V-Guide™ measures the position of the part using the first sensor and that offset is applied to the user frame. The robot adjusts the position of the second, robot– mounted sensor to aim directly at the contoured surface of the part to calculate the refinement offset. Both offsets are applied by the robot to perform highly accurate work for the part positioned in the work zone.
How is this different from typical V-Guide™ applications?
The standard V-Guide™ process uses only one measurement position, which does not change, even if the part is not in the originally trained position. During Iterative Offset Refinement, V-Guide™ uses the first image to calculate the position of the part and the robot moves the second measure position to take a dynamic measure position. Therefore, the first offset is used to adjust the measure position, where the camera is aimed right at the part for the second offset measurement. The first offset captures how much the part has moved from the trained position. V-Guide™ uses the second refinement offset to improve the total offset accuracy from +/-1.5 mm to +/-1.0 mm. Adjusting the measure position to aim the sensor directly at the part allows V-Guide™ to calculate highly accurate offsets because the sensor’s view of the part is nearly the same as the trained reference view of the part. The robot applies the first offset and the second, refinement offset, to adjust the robot’s work within +/-1.0 mm 3D accuracy.
To stay current on all things Liberty Reach, follow us on LinkedIn.


